Tuesday, June 30, 2015

Pattern Review - Butterick 5792

I found this really adorable Hello Kitty with roses fabric from Japan on Fabric.com and just had to get some.  Because I ended up getting a lot of roll ends in my order, I'm pretty sure I scored a lot more than my ordered 4 yards. 

Hello Kitty is hard for a "grown up" to pull off, so if I'm going to wear it, it's going to be sleepwear.  I decided to try out Butterick 5792, which is a pretty traditional, feminine pattern.  I made views A & F, the top and capris combination.  The fabric I used was a little thick and stiff for this pattern, but I liked how it turned out.  Cotton voile would be perfect for this pattern (Liberty, anyone??).

The pants were really fast; I got them done in an afternoon.  The top took a little longer because I had to wait to get the right trim.  I do think you need a little trim around the neckline, although I don't know at this point if it's necessary to use the exact beading lace and ribbon trim.  I do like the look quite a bit.

I made bias tape from self fabric; I liked the clean finish this created on the inside but it was super bulky (see fabric) with all the gathers.  On a cotton voile this might not be so bulky.  I'm not sure that this would be any better or worse than understitching the ruffle.  I could see this finish being really useful for children's clothing though.

For the ruffle, I just cut a 2" strip and then cut it to the right length/shape.  This made it really easy!  I also avoided the weird hemming instructions for the ruffle and just made a narrow hem on the edge, and narrow hemmed the top.


I think my favorite feature of this is the elastic insertion in the capris; it creates a tiny ruffle at the top of the pants and is really feminine.  I added my label as the tag in the back.


The set came out really comfy and will be nice to lounge around the house in.  I did have to scoop the back crotch curve a bit for comfort, so I don't know that I believe these are "semi fitted" as advertised.  (Or maybe I need to remeasure my hips and make sure I'm where I think I am in that area!)  At this point I'm pretty sure my "body space" is larger than the ideal model the Big 4/5 draft patterns for.

I would definitely make the capri pants again; after the minor fitting adjustment they are super comfy and I'll use the elastic casing treatment again in other PJ pants.

Pattern Review - Singer Sewing for the Home Pillowcase

I'm slowly re-decorating the guest room that is my sewing space, and one of the things I wanted to do was to make a zippered bolster cover.

There are quite a few tutorials on sewing bolster covers online, but I wanted a nice one with piping!  This one is pretty good.  I turned to my copy of Singer's Sewing for the Home for construction details.  They don't cover the kind of bolster cover I wanted, but they have instructions for a piped/corded pillow, as well as a couple different zipper closures.  I didn't follow the zipper instructions exactly, but thought they were really good!

While some of their projects may be a little out of date, I thought their instructions were really good and could easily be updated with different fabrics.  For example, their instructions on making flange pillow cases were really good and those pillows seem to be really in style right now.  This is definitely a good addition for the sewing library.

I created 2" bias strips from fabric scraps and wrapped it around my purchased cording per the instructions in the book.

I did not snip the piping tape since it was cut on the bias, and found that the bias stretched really well.  I used pins for pinning the bias to the ends of the bolster, but realized I had a bunch of Clover clips that I bought the last time I went to Michael Levine in LA and used those throughout the rest of the construction.


Finishing the piping.  The cording I purchased goes really soft and "fluffy" whenever it's cut; I wasn't super happy with my piping joins because of this.  I think a firmer braided cording would have worked better.


After I attached the piping, I serged the edges.  Lucky for me the spacing worked out perfectly to butt the piping against the edge of the serger presser foot.


After I attached the zipper I topstitched down both sides.  The Singer book recommends using a piece of tape and stitching along the tape, but I used a 1/4" foot and kept the guide in the seam.  I just used regular all purpose thread for this, but you could use topstitching thread here or pick stitch by hand for a nice effect.


I did backstitch along the seam where I wanted the zipper to start, but I wanted to reinforce it.  I attached the zipper similarly to the tutorial link, centering the zipper over the seam.  The zipper I used was longer than the pillow so I could keep the pull out of the way.  When I was ready to open up the basting, I pulled the zipper pull down before reinforcing the zipper stop area.


Clipping the ends of the pillow in place.  I ended up cutting the ends twice; I was unsatisfied with my random cut and fussy cut the ends to match each other.  I'll keep this in mind the next time I make a pillow.  I also unzipped the zipper about halfway so that I could pull the pillow case right side out afterwards.


Using the zipper foot to stitch the pillow together.


Completed pillow on the bed.  I should have fussy cut the main part of the pillow too; the geometric design isn't quite centered on it.  My husband thinks this is OK.
 

The print above the bed is what I'm decorating the room around; it's called "Lovers at Chi Tou"; Chi Tou is a very beautiful forest preserve in my mom's native Taiwan.  I'm trying to pick colors in the painting to decorate the room with; I'm planning to make a bedskirt to match the pillow and I found a beautiful cherry blossom print to recover my ironing board with.

Unfortunately, none of that matches the cute zakka sewing accessories I want to make!  C'est la vie.

Cost Breakdown
1 yard "Artistic Twist" Waverly print from Fabric.com = $21.98
2 yards cording from Fabric.com = $1.36
1 30" YKK Zipper = $2.75
1 yoga bolster pillow from Amazon.com = $33.99 (next time will make my own with poly fiberfill)

Total Spent: $26.09 ($60.08 if you include the pillow)

Monday, June 29, 2015

Pattern Review - Zakka Sewing Bunko-Bon Cover

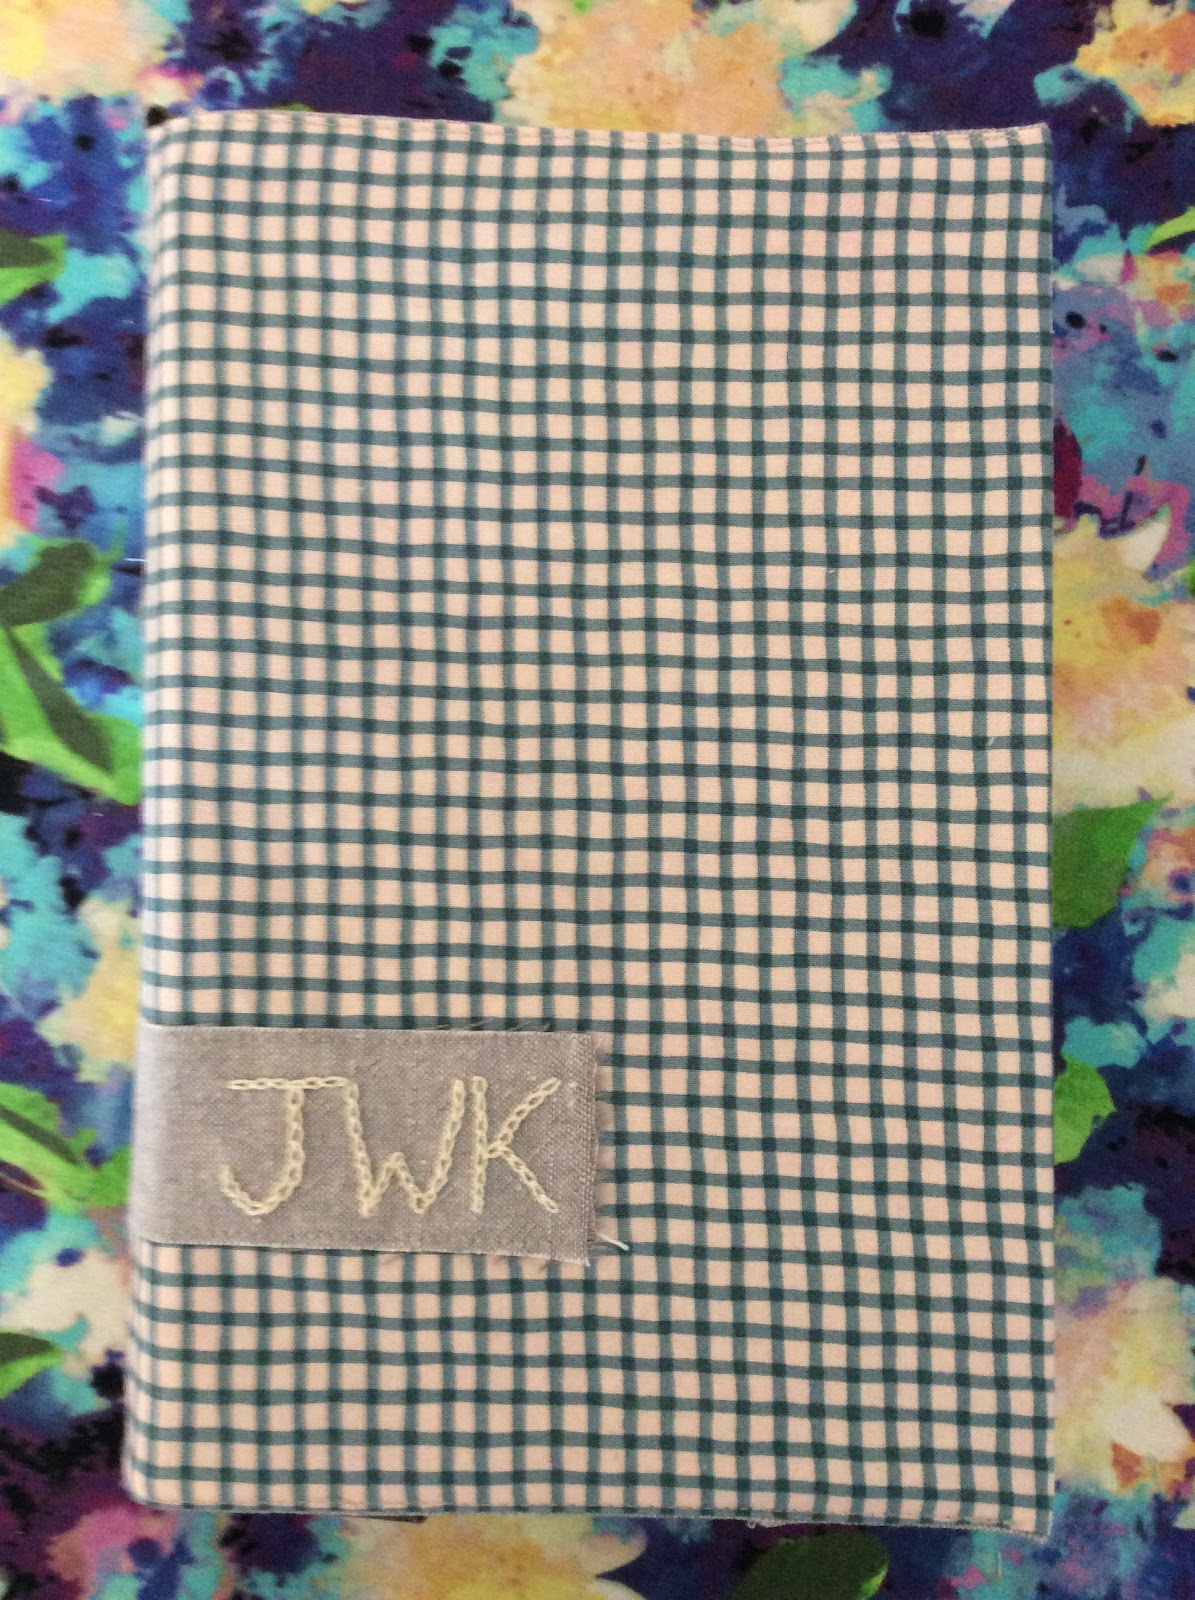
I made this quick book cover for my husband (just in time for Father's Day, this post is a bit late!).  The pattern is from Zakka Sewing, which is a collection of Zakka projects from Japanese designers.  I've found most Zakka books printed in English are from designers based in the United States, and feel something gets a little lost in translation.  "Zakka Sewing" is one of the few such crafting books where I want to make a handful of the projects, or adapt them for my own uses.

One of the projects is a "bunko-bon" book cover, for paperback/softcover books.  In Japan there is a standardized size for their paperbacks, and so one cover can be used for many books.  Thankfully the designer included instructions on adapting the book cover to fit other-sized books!  My husband has picked up a new book series and wanted to keep the book covers/binding neat and clean.  So I made a cover for him using the instructions in Zakka Sewing.

One thing to note is that the instructions seem to miss the applique application.  I've searched for them several times in the instructions and must be missing them by a lot, or they are just not there.  Because I made the cover larger anyway, I folded both the cover and the applique in half to find the middle and then eyeballed how far up it should be.  I also scaled the applique up proportionally.  I embroidered his initials on the applique after I applied it.

I used grey Essex yarn-dyed linen and a cute Japanese quilting cotton.  I used a wide (1 inch) Petersham ribbon for the book mark.


He was very happy with the book cover and I'm planning on making at least one for myself to use when traveling, since all the travel guides are about the same size (albeit different widths! I'll guess I'll have to make a couple!).

Saturday, June 27, 2015

Pattern Review - Simplicity 1427


After Google's announcement that tulle skirts were en vogue this year, I decided to make one in one of my wardrobe colors - it would be an easy project and so whimsical that it would definitely cheer me up whenever I wear it.

This also gave me the opportunity to try one of Andrea Schewe's patterns; I follow her blog on and off and really enjoy reading about her design process and sewing tips.  Simplicity 1427 is one of her first forays into sewing for fashion, as opposed to the costumes she is known for.

I didn't have as many issues with this pattern as some people have; I attribute most of this to Andrea's helpful posts on this skirt.  I thought a lot of her insights were very helpful and explained many of the "why is the pattern like this?!?" questions that many seem to have about this pattern.  The instructions definitely highlights some of the problems with printed patterns and instructions; the instruction writers need to conform to some standard that pattern companies use, even though it's more intuitive to say "cut X strips in these dimensions, piece together to get something Y long", for example.  The pattern instructions also don't tell you why you are doing something, which goes a long way in explaining things like the yoke in this skirt.

Andrea Schewe - Skirt Design Process
Andrea Schewe - Skirt Sewing
Andrea Schewe - Skirt Yoke Explained

I did read through the instructions, but incorporated Andrea's advice and things I had read online about sewing with tulle.  I made view C, the long version, but in the view B length.  I did this by folding the view B ruffle pattern piece along the fold line and overlaying the gather/seam allowance with the view B overlay piece to get the correct length for the overlay.

I used a silk dupioni for the lining; I wanted to get a little gleam from under all the gray tulle and get the nice swishy rustle when I move around in it.  It's expensive ($15/yard) but since the nicer retail skirts go for close to $200 I thought it would be worth it!  You can use a polyester lining or dupioni and make this skirt for a much better value than I did.

Cutting the tulle accurately was a bit of a nightmare; good thing there are several layers and "close enough" is good enough for the project!  I ended up measuring the pattern pieces and cut the tulle at the right measurement.  Many people have commented on "why would you cut it across like this and not down the length of the tulle?"  I read on Andrea's blog that the tulle actually gathers better when cut this way.

The seams are overlapped and not typical seams; I felt this would look the best and would help me avoid pressing the nylon tulle any more than I had to.  I basically overlapped the edges at the seam line and stitched along.  The dupioni seams are all pressed open and serged.

I struggled a lot getting the elastic in the casing; I think the opening needs to be just a little bit bigger.

The skirt is sufficiently poofy, but I feel I get a little bit of lining peak-through on the yoke.  It's not enough to bother me but it's something to consider if you are using a contrasting lining or a light colored tulle.  I can wear a belt or a top over it to cover it if I feel self conscious.

I don't know that I would make another one of these again, but it was pretty easy (if a little time consuming in gathering the tulle!) and wearing the skirt feeds the carefree elements of my personality.  It would be nice to have them in a few colors but it's so out of my typical style that I don't know I need more than the one.  I do recommend the pattern, but just be aware of the instruction limitations and take a look at Andrea's comments.

Cost Breakdown

15 yards of silver tulle from Fabric.com = $14.85 (I have a bunch left over that I plan to make a matching hat with)
4 yards of silver silk dupioni from Silk Baron = $60 (I have probably 3/4 yard left over to make a hat with)
1 1/4 yard of 1 1/2 inch wide elastic = $2.48

I also purchased a spool of Gutermann thread when my thread stash came up short = ~$5.50 (bought the big spool)

Total spent: $77.33 ($82.83 if you count the thread)

Wednesday, June 3, 2015

Pattern Review - Butterick 5006


I made this for a friend who loves to knit.


I made view C, the circular knitting needle case.  I changed the cover to be similar to the scrappy needlebooks I made earlier, since I thought it looked really cute and I had the leftover scraps.  I'm really in love with this collection of quilting fabrics and want to make a coordinating set of "mug rugs" or small placemats in it for when I bring out my nicer tea sets.


I have a bunch of coconut buttons I purchased the last time I was in Hawaii (in 2011!!), and thought the flower one would be perfect for the case.  I interfaced the button attachment area for stability.

I looked at the instructions, which seemed to be straightforward, and then put the case together on my own from memory and personal intuition.  I didn't use a fusible batting; I opted for a layer of Warm'N'Natural instead.  It can be quilted up to 10" apart, so I think it will be fine for the pages (the cover is quilted to the front when the front gets embroidered).  I hand embroidered the flower applique in chain stitch using three strands of floss.  The cream running stitches are with a pearl cotton in size 8.


For next time, I will make the tab about an 1-1/2" shorter, and sew the button hole further from the edge.  The sewing of the cover is a bit sloppy and next time I might draw in the 1/2" seam allowances on the curves to help me out. I don't like the look of the inner pages peeking out and might try something different with that, either sew in the pages side by side or make the inner pages a little smaller to accommodate. I definitely want to make this again and this will probably be one of the patterns I trace off on cardstock to have as a go-to gift for my knitting friends.

I have view B cut out in linen and more Aloha Girl prints for another friend who knits on straights.


Wednesday, May 27, 2015

Scrappy Needlebooks

Completed Needlebooks!
I can't really take credit for these. I been desperate to get back into sewing, long stymied by my great ambition and complete lack of real success.  This spring I've been itching to get back to sewing, and have decided to focus on smaller projects that I know I can complete. I do still want to make my entire wardrobe someday, but my skills need to catch up.

The big project (full of little projects) to get me sewing again is to make a suite of sewing accessories; a needlebook, a hussif (sewing kit, I will tailor mine for hand embroidery), knitting needle cases, and reline my sewing basket.  I would ideally like to do all of these little projects in coordinated fabrics, but that will most likely change as I can't settle on a theme.

I found this adorable needlebook tutorial on Nana Company's blog, as well as a follow up post with some changes she has made as her design has evolved over time.  I made these for friends; I thought about adding embellishments to the pages but the needlebooks are so small I honestly didn't think it was necessary.  I added a pocket to slip a seam ripper or slim notebook in, and used 100% wool felt to keep the needles sharp and lubricated.  The fabrics used for these is "Aloha Girl" by Moda.

I really love how low commitment this project is - if you are scrapped for time you don't even need to  put together a patchwork back 'cover' or do any applique, quilting or hand embroidery.

The two needlebooks in progress. The unfinished covers at the top, the pocket, both on top of the lining fabric.
Completed open needlebook

Completed back cover


Thursday, September 26, 2013

Tried-and-True Outfits

I recently purchased two dresses of the exact same style as a dress I already have.  On my last trip to LA, my fiance convinced me to buy a Patagonia Bandha Dress in an indigo blue.  It ended up being the dress of the summer; I wear it at least two or three times a week after work.
I had the spare clothes hangers in my closet, so I splurged recently and purchased the Bandha dress in black and teal.  Unfortunately it's only available as an extra-small in pink on Patagonia's website, but you can find it in other sizes and colors around the web.  I just know it's the kind of thing that I'll get a lot of use out of.  I already plan on packing the black dress to Europe later this fall.

A lot of sewists use the same concept when they develop TNT, or tried-and-true, patterns.  You put all of this work into getting a pattern to fit you just right that you have to capitalize on it somehow!  If it looks great on you and fits perfectly, why not make a few in different colors?  The only thing I've made that has become a TNT for me is Vogue's recent lingerie release (Vogue 8888); the bias-cut tap pants are delightful to lounge in.  I love that you can make them using french seams, and with a little change to the elastic insertion, they are very ready-to-wear and fit me well out of the envelope.

Eventually I'd like to make all of my outfits "tried and true", where I love them and feel like a million bucks just to put them on.  I think a big key in finding a TNT pattern is picking a classic style.  I hope to find the right button-down shirt pattern, woven shell, wrap dress, sheath dress, jeans, and trouser patterns.  It's going to take a lot of time for me - I don't sew very fast!

I'm making good progress on the white linen pants; hopefully I'll finish them up this weekend and do a review.  They're not fitting as well as the muslin did, but I did learn some stuff about fitting pants and will be able to take that to the next pant project.  My fiance says they show off my butt pretty good, and they're comfortable, so it's not a total loss.  They definitely look better than a lot of the ready-to-wear pants I see out there!  The facing is flipping out in the back, so I will probably tack it down and maybe insert some elastic to keep it snug against my body.

I'm also making progress on my Hello Kitty Pajamas; I'm hoping I'll have the top finished by the end of this weekend also.  I'll attach the collar next, then sew up the sides and sleeves.  Then buttonholes.

Friday, September 6, 2013

Wardrobe Curation Thoughts

After three (three!) runs to Container Store over last weekend, I'd say my closet is about 90% purged and organized.  I ended up buying a lot more blouse hangers than I anticipated, and will probably go back to get a few more coat/jacket hangers as I fill in the outerwear gaps in my wardrobe.  The closet looks amazing though, and it's been so easy to find things and put them away.

There is some useful information out there that shows you how to put a wardrobe together, although the most common advice seems to be "think about what your wardrobe is missing, that fits into your style".  I've read of bottom-to-top ratios of 1:2-4.  I've read multitudes of articles on "finding your style".  There's some color discussion and personality discussion in there as well.

My style, like most Americans, is a bit all over the place.  I have a conservative corporate office job, but love to wear sundresses and flip flops on the weekends (it's the native Californian in me).  I love dramatic outfits for when I go tango dancing and to the symphony/theater.  Is there such a thing as a dramatic sundress?

It's something I'll have to think about.  Even though I have a few pieces of clothing identified that I want to buy, I think I'm going to put a hold on buying new clothes for a while so I can collect my thoughts about where I want my wardrobe to go.  When I was in high school one of my teachers had us do a writing exercise which involved envisioning where we saw ourselves at 30.  I know one of the things I so desired and thought I would have was a lovely wardrobe (also nice perfume).  I have the nice perfume now but (in my mind) an OK wardrobe.  At the very least, I don't think it represents me just yet.

Janice from the Vivienne Files has some great posts on building wardrobes, Project 333 style.  It's a neat philosophy, but trends towards having more separates and fewer dresses.
Redefining Normal - Besides showing how many outfits you can make with 33 pieces of clothing, she references Mother Jones in how our fast fashion culture has exponentially increased the amount of clothing we consume.  Wouldn't it be great if we could get the number of new clothing items down to 10 a year (like what most people say the French consume?)?
Building a Wardrobe By Fours - Here she demonstrates her formula of creating a 33 item wardrobe
Some Examples of Building Wardrobes: My Clothes, Camel & Navy, Warm Colors
One specific example (over two blog posts) of integrating new pieces: Dream Specific Wardrobe Dreams, Dream Wardrobe

Going off of this philosophy, I'm going to try to take my list of french-inspired wardrobe pieces and break them down into the steps of building a wardrobe by fours:

Step 1: Core of 4 (Black)
  • Wool Dress Pants
  • Blazer
  • Skirt
  • Dress
Step 2: 2nd Neutral 4 (Whites/Greys)
  • Linen Pants (White)
  • Button-down Blouse (White)
  • Silk Button-down Blouse (White)
  • Skirt (Grey)
Step 3: Bridge/Accent Color 4 (When Things Start To Not Go With Everything)
  • Cocktail Dress (Red)
  • Skirt* (Red)
  • Bowtie Blouse (Ocean Blue)
  • Polo Shirt (Dusky Plum)
Step 4: More Bridge Garments/Tertiary Neutral
  • Jeans (Blue Denim)
  • Wool Pencil Skirt (Navy)
  • Denim Shirtdress (Navy Denim)
  • Cashmere Sweater (Navy)
Step 5: More Tops
  • T-shirt (Black)
  • Long Sleeved Raglan Top (Navy)
  • Chambray Top (Light Blue)
  • Turtleneck* (Black)
Step 6: Prints & Textures
  • Breton Top (Blue & White Striped)
  • Chanel-inspired Jacket (Black & White Boucle)
  • Chanel-inspired Skirt (Black & White Boucle)
  • Silk Chiffon Blouse (Navy Print)
Step 7: Some Sort of Signature Something
  • DVF Wrap Dress (Black, White, Teal, Brown Print)
  • Sweater (Red)
  • Cowl-neck lace top* (Black, something I have already)
  • LBD (Black)
Step 8: Filling In Essentials
  • Dressier Jeans (Navy Denim)
  • Denim Skirt (Light Blue Denim)
  • Leather Jacket (Black)
  • Evening Top* (Red)
  • Tank Top (Black)
* denotes new item not currently on the French Wardrobe list

I thought this was a really useful exercise; it definitely helped me to point out holes or gaps in my wardrobe.  I ended up adding a few tops, which I had mentioned was a hole before.  I also added a red skirt, which would be flashy and nice to wear with a lot of other things (namely black tops but I could see it working well with a lot of other things).  I'm not sure I'll use this strategy again but it's certainly interesting.

Thursday, August 29, 2013

Closet Curating & Container Store Run

I'm getting stoked for the long weekend, and besides lots of sewing projects I plan to start or finish (finishing up the white linen pants, plus a cami-and-tap-pant, two pajama sets, and a peignoir and nightgown set started) I plan to organize my closet also.  I have a grand mishmash of wood hangers, a hanging sweater shelf, and two or three varieties of plastic hanger, and the popular thin felt/velvet hangers in my closet right now.  Time to sweep all that out and start fresh!

I want to get all-wood hangers in my closet, and will probably incorporate them (some of them were prettily-decorated with painted flowers by either my mom or me) in either this closet or transfer them to the stuff in the hall's coat closet (which also has an interesting collection of hanger types).  My thinking is that I'll keep the number of hangers the same and this will help keep my wardrobe down (especially if I don't cheat and buy more hangers!).

This collection should be enough to store my entire planned wardrobe, plus a few extra hangers for "dog park", "tango practica/milonga", and "workout" capsules.

10 - Premium Walnut Coat & Shirt Hangers
10 - Trouser or Skirt Hangers (I haven't decided, but I'm leaning towards the skirt hangers even though I like the look and ease of the trouser hangers)
24 - Blouse Hangers (4 sets of 6 - I could get the case of 36 hangers but that sort of defeats the whole point of actively forcing myself to have a smaller, nicer wardrobe)
1 - Belt Hanger
1 - Scarf Hanger

This should provide more than enough hanging capability for my planned wardrobe + extra capsules.

In addition I think I might go ahead and organize my nightstand drawers with better/nicer boxes to put undergarments and socks into.  Maybe something like these (Container Store used to have pretty Linen & Silk boxes, but I guess they stopped making those. . . ), but I'll have to take notes at home about exactly what I need and should get.  It would be nice to make a lot of organizing progress and consolidate my nightstand clothes down to two drawers so I can use the top one for storing all the stuff that's currently on top of the nightstand (Books, Glasses, More Books, Sentimental Cards, Hand Cream, More Books).

The 40-hanger-closet gets cited a lot on the internet, and it's not a bad article to start with.  I've been a little frustrated with most of the drawer organizing tips online, because they end up being filled with "get a box!" sort of advice, but no clear information on what size works best for what items.  Plus, all the images I've seen of "organized" drawers look like removing one item will cause the whole system to crash.  Not what I'm looking for.

Friday, August 9, 2013

Hemming Jeans

I've hemmed a couple pairs of jeans now, one for my fiance and one for myself.

This is the technique I use, which is very similar to the one on Coats & Clark's blog:
1. Measure the length to shorten, in my case it was 3" exactly.
2. Fold up half this length (1 1/2") and stitch very closely to the original hem.
3. Flip the hem out and press.
4. Stitch in the seam or slightly above the new hem seam to help the hem not flip out later.
5. Cut off the excess if necessary and finish the edges.

This takes me about 20 minutes from start to finish, so there's no reason not to do this yourself as opposed to taking your jeans to a tailor.  I use denim needles, even on the thinner "designer" denim, and a denim thread from Gutermann.  I should look into getting a darker denim thread for darker washes, but from 6 feet up no one will notice the hem!